Sunday 25 July 2010

Aeroplane Cake

I was approached to design a cake for a 60th Birthday celebration. The Birthday boy has worked for British Airways at Heathrow Airport for over 30 years and his Daughter asked me if it would be possible to include a Boeing 747 on the cake.

Here at Restoration Cake, we are not afraid of a challenge!

We decided to make a simple Chocolate Mud Cake - which is probably my favourite cake in my recipe book - cover it in sky blue icing and fluffy clouds, and crown the whole thing off with a plane made of fondant icing.


This is me, attaching a red ribbon around the sky blue basic cake.

We had shaped the body of the plane, as well as the wings and tail fins, the night before in white fondant icing, which was now firm enough to handle and paint.


Windows and doors painted on and tail fin and body branded in BA red and blue.

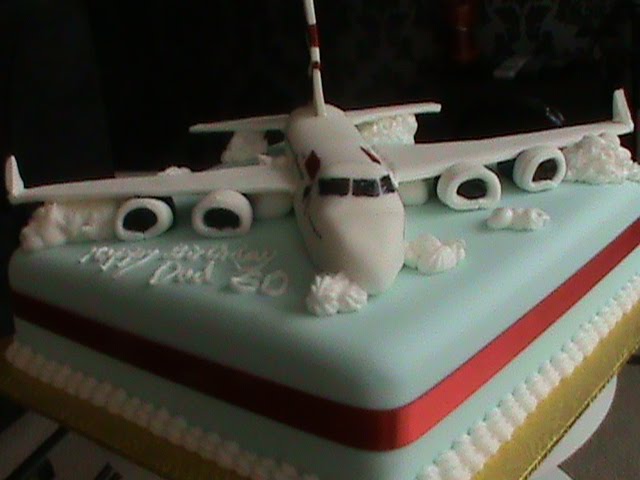
Then comes the scary bit... putting the plane together on the cake. If the model breaks at this stage, you end up with a real plane-crash of a Birthday cake!


Thankfully, there is a certain amount of artistic license that can be taken in cake design - while the plane's wing is rigid and attached to the body of the plane, it is also supported from beneath by the engines and a strategically positioned cloud!


When we shaped the body, small ridges were made to hold the wings and tail fins secure. Before the pieces are inserted, a small amount of royal icing is applied as a glue. Ever made a model aeroplane? Thankfully, my partner in crime has made many and all his boyhood hobbycrafting came in most useful for this job!


Checking everything is in-line!


Sealing the tail fin into the body with royal icing, which is smoothed into a seamless join with a paintbrush.

So at this point, we stood back and admired our work.


I am off now to order the entire DVD set of Ace of Cakes for Chris, who has discovered a real talent for edible model-making! Watch this space for more awesome creations from Restoration Cake!

Cx

Sunday 18 July 2010

Sunday Lovin'

What a week it has been! I have met with some truly fabulous ladies, all of whom are playing a part in helping me to get Restoration Cake off the ground.

I started the week in the offices of Fiona Humberstone at Flourish, discussing all things branding and web design. I came away with a lot to think about and loads of ideas. Plus, I cannot wait to buy a Pritt Stick and start making a mood board!

Then I had a lunch meeting with the lovely Sarah Murray of Perfect Wedding Magazine. We gossiped about weddings and cakes and wedding cakes in particular! I even received a thank you message from Sarah to thank me for the golden mini-red-velvet-cake that I gave her - which made it all the way back to the office in Bristol without being devoured on the train!

Yesterday, I had lunch with Tiffany Grant-Riley and Annabel Beeforth of Grant-Riley Weddings and Love My Dress (respectively) to meet and deliver a box of Baby Shower themed cupcakes for a photoshoot. Tiffany and Annabel are both gorgeous and both pregnant (positively blooming!) The shoot will be made up of a group of lovely ladies, all of whom are working in the wedding industry, and all of whom are pregnant or raising a child. When Tiffany approached me to supply some cupcakes for this shoot, I jumped at the chance to get involved. Though my current parenting experience is limited to spoiling my two kitten-babies, Sid and Nancy, I feel very strongly that women in business should stick together and support each other.

This week, I am proud to say that I have been featured on Rock 'n' Roll Bride. I noticed a tweet that Kat Williams had posted saying how excited she was about her forthcoming re-brand and I offered to make a celebration cake for the occasion. Thankfully, Kat was happy to accept a cake! The new look Rock 'n' Roll Bride went live this week and Restoration Cake was lucky enough to share a little of the Rock 'n' Roll spotlight!

http://www.rocknrollbride.com/2010/07/things-are-looking-a-bit-sparkly-new-around-here/

As if this was not enough for one week, I am thrilled to tell you that I have been featured on Rock 'n' Roll Bride once more today!

A few weeks ago, I was photographed by the gorgeous Miss Lex of Rockabetty Studios. Lex came to my place - along with Miss Ellen, her fabulous make-up artist - and they papped me as a 1950's pin-up girl! The experience was amazing! I really felt like a star. You can see other examples of Rockabetty Studios work at their Flickr page and I will blog a link to their website as soon as it goes live. What I will say in the meantime is that Rockabetty Studios are available for hire and their standard package includes a home visit, champagne, make-up and hair-styling, costumes, and a set of photoshop-finished pics.

Both Miss Lex and I have been leaking my finished photos on Twitter and these caught Kat's eye. Today, my Rockabetty photos have been featured as Kat's Sunday Kind of Love post.

So for those of you who have not yet visited Rock 'n' Roll Bride and fallen into Kat's wonderful world of weddings with a difference, I attach the following link, where you will be able to see the full set of photos that I did with Rockabetty as Miss Charlotte! I know that one visit will leave you as hooked on Kat's world as I am.

http://www.rocknrollbride.com/2010/07/a-sunday-kind-of-love-restoration-cake/

Cx


A little something to whet your appetite!

Sunday 11 July 2010

Restoration by Rockabetty - Behind the Scenes

As promised, here is a little treat to offer a little half-time entertainment.

This short film is behind the scenes footage from the shoot that I did with Rockabetty Studios.

Sneak peaks of the finished pics have already been up on Twitter (follow me, if you are not already) and the full photo set will be posted very soon.

Enjoy and giggle at my posing techniques!

Oh, and I should give a special mention to Chris White, who filmed this footage and puts up with all my posing on a daily basis! MWAH!

Cx

Saturday 10 July 2010

Restoration Goes Rococo

So I preface this post with yet another apology for neglecting my blogging duties - hear me out though, because I have an awesome excuse... I have been stupidly busy. OK, so this is nothing new but I have been putting some serious hours into getting myself in a position to start running Restoration Cake full-time. Yes, this would mean leaving the dayjob and putting all my faith into this enterprise.

Thankfully, I have faith. I have faith by the bucketload. What I am trying to get sorted is the financial side, which is like doing a really hard maths class with a head full of air and vanilla essence. My attention span has suffered and the 140 character limit on Twitter has been about all I can handle!

This post was meant to come to you a few weeks ago after I spent a Saturday morning at Rococo Chocolates’ School of Chocolate in Motcomb Street.

A small be perfectly formed group of 5 ladies gathered together to learn the art of tempering Chocolate with Rococo’s ‘Prof du Choc’, Laurent Couchaux.

Who knew that melting chocolate was such a science? Without wishing to bore you – because this all fascinates me – chocolate is made up of 6 individual crystals, each with a different melting point, which means that the process of melting chocolate correctly (tempering) has to be done in stages. When this process is followed correctly, chocolate can be melted and re-set many times without losing its texture.

To explain the pictures below, I should give you a potted guide to the process of tempering (which is super precise and has to be done with a thermometer and everything – making me feel like a proper scientist!): the chocolate is heated to a high temperature, then stirred until the temperature reduces. The whole bowl of melted chocolate is then poured out onto a marble slab and almost paddled to reduce the temperature still further.


The chocolate then goes back into the bowl and a small quantity of hot melted chocolate is added to the mix, which is then stirred to reach the magical working temperature. It is a lengthy process but you have to work fast to avoid missing the important temperatures!


Then the fun bit… we were given a piping bag, the famous Rococo fish moulds, and a sheet of acetate.


I made 8 yummy fish, some dark chocolate and rose wafers (like really thin chocolate buttons), some chocolate buttons (because I am an overgrown 6 year old at heart), some random shapes, and I even managed to write my name in chocolate! Oh and I had a bash at the Restoration crown too!


My goodness, chocolate is a lot messier than icing! I think I will save my tempering for special occasions only.

I am now desperate to go hunting for some cherub moulds and a good thermometer! How stunning would white chocolate cherubs look on a chocolate Wedding cake? Oh, the possibilities are endless when you learn a new craft.

You can find the Rococo School of Chocolate course guide here: http://rococochocolates.com/chocolate-school.html My 3 hour class cost £100 and included all materials, a chocolate tasting, and all my lovely chocolates to take home! I cannot recommend this enough.

Cx